Showing posts with label Organizing. Show all posts

Thursday, September 17, 2015

Ways to Display Lego Minifigures


Do you have a child who loves Lego's

Do they like to build the Lego kits or go straight for the minifigures?

At our house we have both types of Lego lovers.  My 10 year old son is not a huge fan of building the kits so after ripping open a box he will go straight for those little men!  He'd rather take those minifigures, some random Lego blocks and create his own scene.  We have since stopped buying the kits and opt for just the blocks and figures.

My 5 year old daughter is kind of lover of both.  Unlike my son, she will sit tight building a Lego kit no matter how long it takes - she is rather determined!  She also likes the minifigures but just not as much as her big brother.

And then there are those Lego surprise packs.  Each pack has one minfigure but you never know which one you'll get.  My husband is obsessed with them and can't help but picking up packs of  them especially when a new series comes out.  We fill Christmas stockings and Easter baskets with them and the kids are always super excited to see which figure they got.

This is all fine and dandy but what is one to do when the minifigures become too much?

Here are some ideas from ones we use and a couple of others from around the web:

We love yard sales!  My husband picked up a brand new, still sealed shot glass display case for $2!  You might be asking yourself, what does that have to do with Lego's?  Everything!  This case was PERFECT for displaying my son's collection of Lego minifigures.  A bonus with this case is that he can easily open the door and switch out which figures he wants to display.  We also made it clear that the figures in the case are his 'special' ones and totally off base when friends come to play.


Another favorite in our house is this Lego stand. A few years back I purchased this on Ebay and it has worked great.  We actually keep ours on the kitchen table only because the kitchen is our 'go to' room in the house for almost everything.  My son just plopps down at the table and moves the figures around, makes scenes, creates battles....you get the idea.  I really didn't like having toys at the table but it's where his creativity seemed to come alive.......


I wish I still had the Ebay info to share but I don't, sadly.  It is a DIY stand so with some thought I'm confident something similar can be pulled off!

Here are a couple of other ideas from around the web:

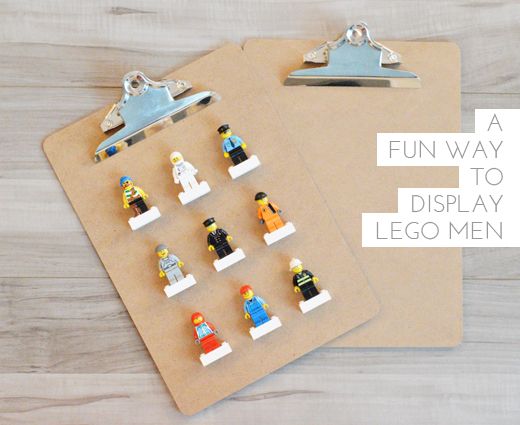
I really like this idea from Sarah M Style who simply uses a clipboard and a few other items you probably don't have to run out for.


Another favorite comes from Our Nerd Home who refurbishes an old picture frame into a very cool almost vintage looking display for their minifigures!
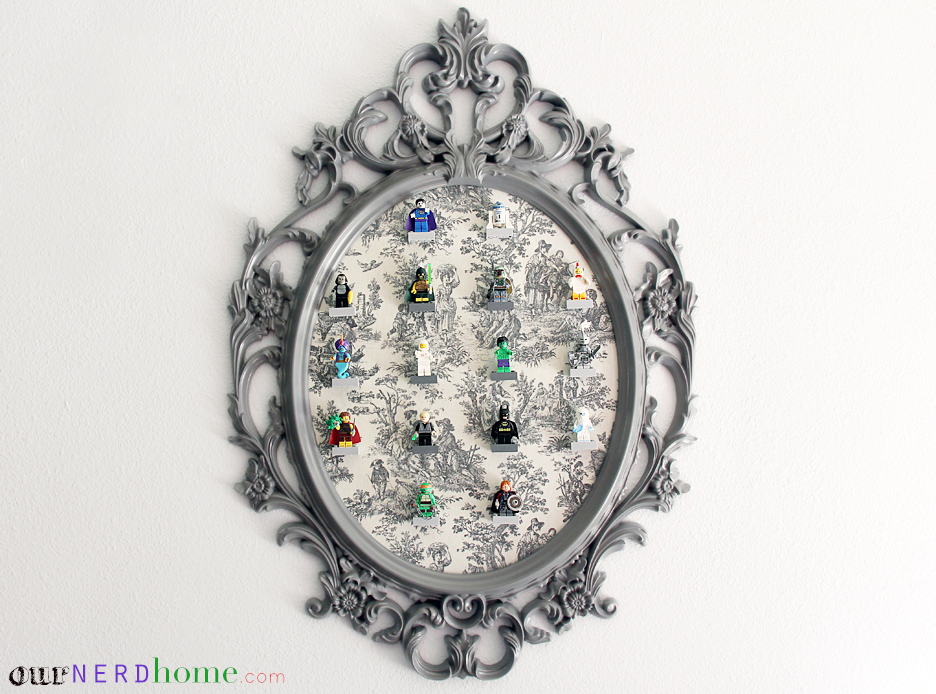

Geek Home Decor - DIY LEGO Minifigure Display


For more Lego ideas, check out our Lego Pinterest board.

Monday, July 20, 2015

Rain Gutter Bookshelf


My daughter is a book worm and I LOVE it!  My favorite place to find books are at yard sales.  I've found so many classics like Dandelion, The Cat in The Hat, Goodnight Moon and many others and usually all for under a buck, can't beat that!!  However, with this collection of books comes less and less space to store and display them.  We were using my daughter's toy bin organizer.


As you can see that was not working, at least not for me.  It was messy and I've been reading how displaying books with covers facing outward draws the child to the book.  My search began but where to start......?  Pinterest, of course!

Lately, when it comes to organizing I'm thinking hanging more since floor space is limited.  We went vertical with organizing my daughter's stuffed animals and it has worked GREAT!  I knew the bookshelf would have to be something that could hang too. I found lots of great wall book shelves but most were a bit too pricey. Finally, I found what I felt to be a fantastic idea and inexpensive........rain gutter book shelves!  It sounds strange, I know BUT it works really well!

I found a great tutorial for hanging these bookshelves at Raising Olives.  I so wanted to hang on my own but I have been known to have a tad of trouble even with hanging a picture so hubby to the rescue!  My husband was a real trooper about it and we even spent part of our date night at the local Lowe's!

This bookshelf was really easy to hang and it took my husband about 2 hours start to finish.  You can probably get this done in less than that but my husband is a bit of a perfectionist  procrastinator!

If you decide to do this keep these things in mind: 

  • Gutters are sold in one 10 ft piece that you will need to cut down to size UNLESS you have a wall that can hold the entire 10 feet.  
  • If you have a small car you may want to consider borrowing someone's SUV or larger truck.  We have a Ford Explorer and the piece literally went from the back ALL THE WAY to the front dash. 


  • Don't forget the end caps for the gutters!  Be sure they fit before leaving the store
  • Don't forget brackets - you will need 2-3 brackets per 5 foot piece.  (we used 2)
  • Be sure to get the more decorative gutter that looks more like a crown moulding.  They also sell the less decorative ones and although it will work, it is not as 'pretty.'
A little secret - we originally bought the 'non pretty' ones and I didn't realize they were not the right ones until after they were hung, yikes!  My husband did take it down because I really wanted the 'prettier' ones.  But if you can't get the 'crown molding' type this will work too:

Here's a shot of the less decorative rain gutter.  The main difference is the brackets can be seen.


The bookshelf cost a total of $16!  Way cheaper than other bookshelves I found.  It does not hold as many books as when we had it in the toy bin but since I rotate her books I put out some and put the others in a shelf in her closet. 


The best part is my daughter loves looking at her books now more than ever.  I use to pick her books at night but since this has been up I find her sitting in front of the shelf picking out books before I even come into the room!  

And if you're looking for other ways to display books check out some ideas from Alpha Mom.


Sunday, May 31, 2015

Organize Stuffed Animals


My daughter LOVES her stuffed animals!  But we have a standing rule, if a new stuffed animal comes in, one goes out.

Admittedly, we have way too many stuffed animals and I am always looking for new ways to organize them.  For awhile we were using this stuffed animal chair, kind of like a bean bag chair but stuffed with furry friends instead! Sadly, the chair ripped and so we were in the need of something else.  We still use a large Thirty One tote and a cute little frog both of which are still holding up, thankfully!

Since I don't want to use up any more floor space our latest stuffed animal organizer goes vertical.... an over the door shoe organizer! Just browse Pinterest and tons and tons of ideas will come up on how to organize with them. We also use one on the back of our coat closet which is in our kitchen and holds all kinds of things!

For the stuffed animals I bought a clear shoe organizer and it's definitely the way to go because your child can easily see which animals are in each pocket.  My son has one too but the pockets are not clear and not as easy to see.


I hope this simple idea helps with organizing your child's stuffed animal friends!


Thursday, August 21, 2014

Organize Measuring Cups and Spoons


I don't know about you but the cabinet where I keep my bowls and lids is not pretty!  This cabinet also houses my measuring cups and measuring spoons which needless to say gets lost in the mess.  I really need to do a complete overhaul of this cabinet but I'm taking baby steps and decided to start off with the measuring cups and spoons.

Command hooks are prominent around our house and so I knew their must be a way to incorporate using command hooks to organize this cabinet.  I really did this cabinet on a whim using materials I already had around the house.  I didn't want to go and buy more cork sheet so I did the best with the cork I had on hand.  It wasn't a perfect fit but it works.  I also used ribbon I already had and thankfully had some extra command hooks lying around! One of my command hooks is even off center but who cares, anything is better than the mess I was dealing with!! With 2 kids home while I did this I'm certain at least one of them was tugging on me for something! But this is really an easy diy project,  here's what you'll need:

Cork Sheet (I used a very thin sheet)
Re-stickable tabs or double sided tape
Mini Command hooks or push pins
Ribbon or twine

First, you want to measure your cabinet door and cut the size of cork that will fit it.  Keep in mind that cork sheets come in different thickness so be sure to get one that will work best for you.  I already had some cork in my craft supplies so I used that.  If you use a thinner sheet, like I did, the command hooks will work best.  If you have a thicker cork sheet you can use push pins.

You may want to use either double sided tape or Scotch re-stickable tabs, which is what I used so that the cork has something to stick against.  If the cork you use is thin enough you may be able to just tack the cork around and under the edges of your cabinet door.

Now you're ready to stick on the mini command hooks or push pins to the cork sheet.

Finally, grab some ribbon or twine, loop it through the holes on the handles of your measuring cups and spoons, tie it off and hang!!  Voila, you now have a new home for all your measuring cups and spoons!  I never have to dig around anymore in a jumbled mess of bowls, lids and containers!!

Where do you keep your measuring cups and spoons?  Let me know in the comments below!


Tuesday, August 12, 2014

Organizing Your Child's Artwork and School Papers


With the new school year upon us one is left to wonder what  to do with the plethora of papers and artwork that comes home from school.  Seriously, how much can a refrigerator hold!?  Last school year I used some of these methods of displaying artwork:

  • Using clipboards which makes changing the artwork super simple!


  • Artkive, an app that stores your children's artwork.
  • Framing art that's extra special.

These are great options but I still needed help to organize my children's school work whether artwork, report cards, etc.  One day while wandering Michael's Arts and Crafts I came across an art portfolio that looked like it might just work.  Before purchasing, I decided to research and read some reviews about it.  I was pleased with what I read and quickly went back and purchased 2, one for my son who at the time was in 2nd grade and one for my daughter who was in her first year of preschool.  It has 24 pages front and back so can hold up to 48 pieces of paper.  Now, depending on how much stuff you hold on to you might be able to get 2 school years out of one book.  I am a bit sentimental when it comes to my kids artwork so for my son I will be purchasing another portfolio for this upcoming school year.  As for my preschooler I still have a few pages left in hers.


Most of what I have added to these portfolio's is artwork and for my son I've also included his report cards and other schoolwork that was not necessarily 'art.'


This is about how thick my son's portfolio became by end of the school year

Their are so many great ideas out there, just google "organize school art/paper work" and tons of fantastic ideas will pop up.  Every family is different so a system that works for one may not work for another.  The key is to do your research and then pick the one that's best for you and your family! I hope this post will give yet another idea/alternative on how to organize your children's school papers.

For me, I am pleased enough organizing my children's school work this way that I will continue purchasing these portfolio's, putting them into a large bin and storing the bin in our basement or attic.  This way whenever I want to take a walk down memory lane or pass them onto my children once they are grown I should be able to simply grab the bin and reminisce!

More info about the Itoya Profolia is online at Amazon.  The opinions were 100% my own and I was not compensated by Amazon or anyone associated with Itoya Art Profolio.

I would love to know how you are storing your kids school work papers so share away in the comments below!


Wednesday, July 30, 2014

Doorknob Chore Chart


My 8 year old has been asking for an allowance and I'll admit that my husband and I have been slacking on enforcing our son to do house chores.  We have a chore chart or shall I say, chore tube for my 4 y/o and it has worked our perfectly for her.  Not sure why we never really put together any kind of chore chart for my son but.....better late than never!

I came up with the idea of using a door knob chore chart after my daughter wanted an 'in' and 'out' sign for her bedroom door.  After we made my daughters sign (post coming soon!) I immediately got started on the doorknob holder chore chart for my son.

I used 2 pieces of foam just because I wanted more thickness.


To make the doorknob hole I used one of my measuring cups and traced around it to make the circle and cut it out.  I also trimmed about an inch of foam off of each side just so that it would lay better against the door.

One side of the chart says TO DO and the other side says DONE.  I wrote the name of the chore on one side of a clothespin and on the other side I wrote, GOOD JOB!  How it works is all of the clothespins are on the TO DO side, once a chore is complete the clothespin is turned over and moved to the DONE side.  To make the chart more fun I added a few stickers for decoration!


We keep the chore chart hung on my son's bedroom door mainly because most of his chores are done either in his room or near his room with the exception of taking out the trash.  So far this chore chart has worked great and each day my son completes his chore and moves his clothespin!  If he completes all of his chores he receives an allowance every Friday.


I would love to hear about chore charts that have worked for your children.  Please feel free to share in the comments section or on our facebook page.


Wednesday, May 28, 2014

Storing our Summer Essentials

SUMMER BASKETS!


How do you store your seasonal essentials?  

At our house we use baskets that are kept in our kitchen near our garage door which is also where we enter and exit the house.  Our patio door that leads to our backyard is also right off the kitchen so our baskets are kept in an area that we can easily grab and go. For way too long I scrambled to find hats and gloves in winter or sunscreen and swim shoes in summer.  Since we have a very small coat closet I was in need of somewhere else to gather these seasonal must have's!  

We were using a shoe cubby that I no longer needed since I moved our shoes to our coat closet.  A light bulb went off and I thought if we took the 'guts' of the shoe cubby out and just left the 2 shelves I could slide in 2 baskets!!  Yippee, a way to store those things I had always scrambled for!   

 So, with the warm weather finally here I was able to switch out our winter baskets to our summer baskets! Their may not seem like alot here but when you need just one of these things and can't remember where it might be even those few minutes of searching can become frustrating. I'm sure we'll be adding things but for now here are the things my kids will be grabbing for as we head outside.


Once shoe cubby now basket holder!

Everyone's needs will be different so what is considered our summer essentials may not be yours.  What I hope this post will do is give ideas on how to be ready for your outdoor fun! I've learned a few things over past summers and tried to remember those things so that I would be better prepared.  Things like forgetting towels when we were playing in the sprinkler or slip n' slide or when the garden hose just happened to make an appearance. Here's what's in our summer baskets:

1. Hooded towel - (will add one for my son as well)  This way, if I forget to bring the towels outside at least I will only have to run into my kitchen to grab it.

2. Goggles - We don't have a swimming pool but our slip n' slide has a little pool at the end and Tiffany likes to splash around while wearing goggles!  Now we got the goggles covered too!!

3. Sunscreen - Normally we kept sunscreen in our downstairs bathroom cabinet but it made more sense to keep it near all our other outdoor stuff.

4. Sunglasses - Somehow my kids have inherited  way too many pairs of sunglasses!  I included a pair for each so that I don't have to run around the house trying to remember where I seen them last.

5. Swim Shoes - even tho no pool swim shoes are great for protecting those tootsies from bumble bees or when the pavement gets too hot!

6. Sun hat - (will also add one for Jonathan)

I am considering making one basket Tiffany's and the other Jonathan's.

Anything that I felt my kids would use while playing in our yard is what I included.  I am also preparing a beach/pool bag that I will keep stocked with all the essentials needed for heading off to the beach or pool.  Some of the things will be the same as what's in our baskets but duplicates so that I won't have to take from one to put into the other.  Basically, our baskets are meant for when we play outside in our yard.  The bag will be for when we leave the house.

My hope for sharing this post is that it will help give ideas on how you can be better prepared for playing outdoors in the summer. No matter what the activity when one is prepared it's that much more enjoyable!

I hope you'll share in the comments below what your summer essentials are and how you keep them all in one place!

CHEERS TO A HAPPY SUMMER!
Susen


Wednesday, February 19, 2014

Stuffed Animal Storage

The one thing we have way too much of in our house is stuffed animals.  I hear from other parents that they too have issues with what to do with all their children's stuffed friends.  We have most of my son's stuffed animals under control since he is 8 and has stopped acquiring so many.  My daughter however at 3.5 is still acquiring at lightning speed.  The acquisition is not so much from Mom and Dad but from friends and family at holidays and other times throughout the year.  I don't mind this as long as when a new friend arrives we say good-bye to an old one.  The majority of my daughters stuffed animals are kept in her closet and in a stuffed animal chair (more about that later in the post).  For those animals that she plays with often we keep on her bed and some come down with us in the morning and spend the day with us.  The system I have works but like anything else needs revamping once in awhile and that's exactly what needed to be done in my daughters closet.

Often times my daughter will go to her room and sort through her animals I'm guessing in a hunt to find one she hasn't seen in awhile or just looking for a new friend to love.  Either way after a few months of me not paying much attention this is what her closet turned into.


For stuffed animal storage in her closet I use a Thirty-One large utility tote and I also use a frog that is specific for storing stuffed animals which I purchased from Avon.  After just a few minutes I was able to get everything back in its place.  My daughter was actually in her room at the time I re-organized and I thought it would be a good time to part with some of her friends.  Thankfully, she cooperated and we donated a bag full!

Ahhhh, this is better....


Now about the other storage I mentioned above.  I found this at Bed Bath and Beyond and its basically just a piece of fabric that has a zipper.  You fill it with stuffed animals, zip it up and it can be used as a chair.  So kind of like a bean bag chair but with animals inside.  My son has one for his room too but not Disney Princess, of course and they both sit on them either when looking at or reading books.


How do you store your children's stuffed friends?


Friday, January 31, 2014

Quiet Bins

Just check out Pinterest and you will see tons and tons of Quiet Bin/Box ideas.  Types of bins, contents of bins, labeling of bins and so much more!  I was ultimately inspired by Teaching Mama and her post that you can read by clicking on the link and as a bonus FREE printables for your Quiet Time Bins/Boxes.

I haven't put these bins to use yet but plan on it this upcoming week.  My 3.5 year old has not been napping for well over a year now and I would like her to have some time where she can play by herself with little to no supervision from me.  My plan is to rotate the toys after about 2 weeks and use toys that my daughter does not normally play with.


Here's what I included in the bins:


These printables can also be found at Teaching Mama


I found these cute Sesame Street books after I had filled the bins and added one to each bin.  

I hope this post helps inspire you to make some Quiet Time Boxes/Bins for your little one(s)!


Monday, January 20, 2014

Car Organizer with Thirty-One

Who hasn't seen the endless organizing opportunities the Thirty-One Timeless Beauty Bag has to offer!  My son has an ipad and when he takes it in the car it sometimes sits on the seat when he gets out but more often than not it ends up on the floor.  Way too expensive to have that happen so that is when I decided to try the Thirty-One Timeless Beauty Bag in an effort to keep my son's ipad off the floor and in 'a place' when traveling in the car.  I added a small pad for doodling, some markers and 2 pairs of sunglasses.


I put one up for my daughter as well.  Hers does not have an ipad...yet but a pad for doodling, stickers, pencil and markers. I also included 2 pair of sunglasses along with a book.  She took to hers quicker than my son did and doodled and stuck stickers on our first car ride with the bag in place!


Here's a shot of our backseat area now..much more organized than it was before (I should have taken before pictures!!)


Another great thing about this bag is if you want to take the bag with you whether going into a doctors office, hotel, Grandma's house - you can simply take it off the back of the seat, fold the bag and you're good to go!

Do you have a Timeless Beauty Bag?  If so, what do you use it for?


Thursday, January 9, 2014

Counter Top Quick Clutter Clean-up

I bought these baskets a few months back to help keep the clutter on our limited kitchen counter space at a minimum.  It worked for the first few months but as you can see things got a bit out of control.  After just a few minutes of putting things 'in their place' our baskets were back in order and the clutter has remained at a minimum!

PictureBefore

PictureAfter

Wednesday, January 8, 2014

Kitchen Command Center

I needed to have a command center somewhere in my kitchen and this corner of the kitchen seemed to be the perfect spot.  I was inspired to do this project after reading about the command center at A Bowl Full of Lemons. I had already hung a Martha Stewart cork board and although it helped it was not going to cut it.  With all of the paperwork coming home from my son's school and my daughter's preschool I was in need of something much more.  That is when I happened upon the Hang Up Home Organizer from Thrity-One!  


This was the space I had decided on since it was in the back corner of our kitchen but yet a wall that I look at every day when I enter the room.  


This was the Hang It Up Organizer before filling it up.


Voila, the finished product! I love the calendar in the middle which is for my son's school and tells me which activities he has for each day of the week.  A spot specifically for pens and a marker for the dry erase board and 4 pouches, 2 each for both of my children, perfect!  There are also a few other small pouches which I use for coupons and post it notes.  For more hanging space I use clothespins on the top and if there is something I don't want inside pouch (out of sight out of mind) I clothespin it to the front.  I had tried several other ideas for organizing school paperwork, coupons, reminders, etc and I can honestly say this has worked great for our family!


One last close-up shot!