Friday, January 31, 2014

Quiet Bins

Just check out Pinterest and you will see tons and tons of Quiet Bin/Box ideas.  Types of bins, contents of bins, labeling of bins and so much more!  I was ultimately inspired by Teaching Mama and her post that you can read by clicking on the link and as a bonus FREE printables for your Quiet Time Bins/Boxes.

I haven't put these bins to use yet but plan on it this upcoming week.  My 3.5 year old has not been napping for well over a year now and I would like her to have some time where she can play by herself with little to no supervision from me.  My plan is to rotate the toys after about 2 weeks and use toys that my daughter does not normally play with.


Here's what I included in the bins:


These printables can also be found at Teaching Mama


I found these cute Sesame Street books after I had filled the bins and added one to each bin.  

I hope this post helps inspire you to make some Quiet Time Boxes/Bins for your little one(s)!


Learning Numbers

I came across a post from Danya Banya on number recognition which intrigued me because my 3.5 year old likes counting numbers AND jumping and this activity covered both of those things!  I knew I wanted the numbers to be out of sequence so I used painters tape on our kitchen floor (too cold to go outdoors) and randomly taped squares and numbers to the floor.  Tiffany can definitely recognize numbers 1-9 but 10 and up not so much.  I only went up to 12 but next time I will focus more on the higher numbers.


Initially I called out a number and asked Tiffany to jump onto it.  She didn't seem very interested SO I introduced bean bags and that caught her attention.  We have 4 bean bags so I gave her 2 and kept 2 for me.  I asked her to throw her bean bags onto a certain number and then I asked her which number I should throw mine on.  This worked really well.  When we first started playing Tiffany did not know numbers 10, 11 or 12.  But by the end of our game...success!  She called 10 a 10 an 11 an 11 and 12 a 12!!  


Also by the end of the game Tiffany was ready to jump to the numbers that I called out to her!  


This was a great activity that offered gross motor skills by jumping and throwing in addition to number recognition...win, win!!


Shadow Fun

Here is an activity that I take zero credit for. The only invite the kids had for this activity was from Mother Nature!  After living in our home for 15 years I never once took notice of the sunlight that shines perfectly onto my dining room wall.  Perfectly that is if you are interested in a game of shadow puppets!   I'm not sure if it was my 8 year old or my 3.5 year old who found this gem of fun but they both had a blast making different shadows with their hands and bodies. They probably would have played longer but unfortunately we had a school bus to catch.  I have a sneaking suspicion that if the sun pokes its little head out this weekend when we have time to play than more shadow play will be in store!


I enjoyed snapping pics of their shadow play!!


Thursday, January 30, 2014

Playing With Homemade Play Dough

My daughter loves play dough but personally I am not a fan of the store bought kind.  My favorite kind of play dough is the kind I can make at home.  The Imagination Tree has an easy peasy recipe for home-made play dough, click here.  After making this play dough in hardly any time at all Tiffany was creating.  I had some red and green food coloring and I opted for the red.  I didn't put as much red so that it would be more of a pink in color.  

Tiffany making a 'birthday cake!'

I put out candles, sprinkles, some cake pop sticks and a rolling pin.

And this is Tiffany's finished product!

What fun things do your little ones create with play dough?


Saturday, January 25, 2014

Contact Paper Creation

Lots of cold and snowy weather equals lots of indoor time.  My son has also been home from school due to school cancellations.  This has challenged me to find activities that both my 8 year old and 3.5 year old can do together.  Contact paper is always good in a pinch!  I stuck it up to our wall, gave my kids some felt cut out into shapes, etc and let them make their own creation.  It's really neat to see what they come up with.  My daughter enjoyed the shapes mostly and my son enjoyed making a scene with felt people!


I would love to hear what you do with contact paper!

Frozen Plates


I really like when I can find activities that both my 8 year old son and 3.5 year old daughter can do and enjoy together.  With them being almost 5 years apart that can sometimes create a challenge.  With the snow and freezing cold temperatures my son has been home multiple days this past week due to school cancellations.  We were talking about snow and ice and the temperatures that cause all of this to occur.  Then I found this really neat idea on Red Ted Art. We put some pieces from our bushes outside and some small sticks along with a piece of yarn into a paper plate, filled with water and put outside on our patio table.


The next morning we woke up to this!  


Of course I had popped it out of the paper plate first and hung it on our chair so that we could easily see it from the house.  Needless to say it's still VERY frozen!

What kind of winter crafts are you up to?


Friday, January 24, 2014

Heart Stamping

Painting with paper towel or toilet paper roll:
USING A PAPER TOWEL OR TOILET PAPER ROLL BEND THE ROLL SO THAT IT TURNS INTO THE SHAPE OF HEART.  DIP IN PAINT AND Stamp AWAY!  MY 2.5 YEAR OLD DAUGHTER COULDN'T GET ENOUGH OF PAINTING/Stamping AND IT'S AN EASY CLEAN UP!  


Picture


Picture

Thursday, January 23, 2014

Ice Hockey On A Baking Sheet

I'm not really sure how exactly I came across this on Pinterest but I did and had to try it. Considering the frigidly cold temperatures here recently doing an 'ice' related activity seemed appropriate. One of my other reasons for wanting to try this is because my children are almost 5 years apart and their are few activities that I can do of the same thing that they would both enjoy.  However, I felt this one would keep both of their attention and I was right....it was a hit!

Super simple to put together.  Here is the list of what you'll need:

Large baking sheet
White piece of paper a tad smaller than the size of your baking sheet
Contact paper
Marker
Water

I am so not the artist so please forgive my sad interpretation of an ice hockey rink. 

Tape the white paper to the baking sheet with some drawings to look like a playing field.  Next, cut a piece of contact paper larger than the white paper so that the contact paper completely covers the white paper.  This will protect the white paper as you do your next step which is add water to the baking sheet.  I went half way up with water but you can do less than that.  Place in freezer until water is frozen.  Word of advice - put the baking sheet in freezer first and than add water.  I didn't do this and had to do a balancing act from my sink to the freezer in an effort not to spill the water all over my kitchen floor.

For the hockey sticks use large craft popsicle sticks. For the puck you can use anything around the house like a button.  I had a Lego piece and chose to use that 

Once frozen take out of freezer and start your own ice hockey game.  Both my 8 and 3 year old enjoyed this activity.  My 3 year old asked to play later that day and again at night. It's good for eye hand coordination, keeping score and just plain ol' fun! It's still in our freezer and I plan on keeping it there until I need to use the shelf that its on for something else.


Monday, January 20, 2014

Car Organizer with Thirty-One

Who hasn't seen the endless organizing opportunities the Thirty-One Timeless Beauty Bag has to offer!  My son has an ipad and when he takes it in the car it sometimes sits on the seat when he gets out but more often than not it ends up on the floor.  Way too expensive to have that happen so that is when I decided to try the Thirty-One Timeless Beauty Bag in an effort to keep my son's ipad off the floor and in 'a place' when traveling in the car.  I added a small pad for doodling, some markers and 2 pairs of sunglasses.


I put one up for my daughter as well.  Hers does not have an ipad...yet but a pad for doodling, stickers, pencil and markers. I also included 2 pair of sunglasses along with a book.  She took to hers quicker than my son did and doodled and stuck stickers on our first car ride with the bag in place!


Here's a shot of our backseat area now..much more organized than it was before (I should have taken before pictures!!)


Another great thing about this bag is if you want to take the bag with you whether going into a doctors office, hotel, Grandma's house - you can simply take it off the back of the seat, fold the bag and you're good to go!

Do you have a Timeless Beauty Bag?  If so, what do you use it for?


Marble or Pom-Pom run

I've seen some pins on Pinterest about marble runs and on a whim decided to try it out. Since we have some magnet strips on hand and a glue gun I went with the option of hot gluing magnets to the backs of the toilet and paper towel rolls and setting up on the refrigerator.  I taped a plastic bowl to the refrigerator to catch the marbles/pom-pom's.  After testing a few runs I learned that the marbles even medium size made some of the tubes fall off.  To solve this I could have reinforced the tubes by simply adding some masking or duct tape but again since we had magnets and a glue gun on hand I added an extra magnet to the roll so it would be able to hold on better. In addition to that we tried the smaller marbles which worked better but our fave was pom-pom's.  My kids learned how the size of the pom-pom would make some go faster and some go slower.


Here's a closer look.  


I numbered the rolls because as they would fall off my kids would know which order to put them back even though they experimented with arranging them differently.  Both of my kids enjoyed this activity and it intrigued their interest and curiosity.  My suspicion is we will be making more marble or pom-pom run creations! Can't wait to see what we will come up with next!

Have you ever made a marble run?

Friday, January 17, 2014

Butterfly Craft

This past week we began making animal crafts.  This idea came after Tiffany asked to go to our local library to get a book about Lions.  After we came home and read the books I thought it would be fun to continue the animal theme and do an animal craft.  I have found that if Tiffany sees a craft or activity before we  do it than she is more engaged when we actually do the activity.  So, I showed Tiffany some choices of animal crafts and she picked a Zebra and a Lion, see those posts here.  Tiffany really enjoyed making the crafts so I thought I would do a series in animal crafts.

Third in the series is this Butterfly toilet paper craft.  We used paper plates for the Zebra and Lion but changed it up with the Butterfly.  We could have been more fancy with our butterfly but I try to let Tiffany's creations be ALL hers.  Other than cutting out the wings which Tiffany probably could have done and should have this Butterfly has Tiffany written all over it!  

Once the craft was complete Tiffany wanted to fly the Butterfly all around the house, which she did.  After that I found a butterfly nursery rhyme song online which we watched the video for and tried singing along with.  

I have to say I am enjoying learning about animals as much as my 3.5 year old!  At first I thought the craft part of it would just be.....just a craft.  But it has morphed into learning about each animal we craft whether by reading a story or finding a song about the particular animal.  We may just continue the animal theme until the end of the month.  

Gluing on the wings


Voila!!


Thursday, January 16, 2014

Candyland Bingo

My daughters preschool is teaching colors this week. To keep with the theme at home I made up a quick game of Candyland bingo. It was nothing extravagant just a plain piece of paper with some colored squares same as the colors on the cards in the Candyland board game. I gave Tiffany stickers to use as markers as I called off the colors. When I called the color on the card Tiffany used her stickers to match it with the colors on her bingo card.


How do you teach colors to your pre-schooler?


Wednesday, January 15, 2014

Lion paper plate craft

This is 2nd in my series of animal crafts.  So far we are enjoying using paper plates and Tiffany is picking her animal of choice.  This post shows Tiffany's version of a Lion.  She is really beginning to enjoy drawing faces on the pictures she makes and this Lion is no exception!  For the Lion's hair we used self sticking foam cut into squares.  I debated letting my daughter cut the squares herself since they are working on cutting at her preschool and they need practice but I ended up doing it myself and figured we could practice the scissor skills with another activity.  Tiffany really enjoyed painting the paper plate the color of the Lion's skin.  This was definitely the hilite for her with this one!


After the paint dried we added the foam to make the Lion's mane.  Tiffany was glad to pull off the sticky part on the foam pieces but wanted me to attach them. I think 2 paper plate crafts might have been more than enough for one day and it was getting close to bed time.  

Here is our finished Lion:


Animal Paper Plate Crafts

All of a sudden my 3.5 year olds interests are changing.  She has always enjoyed going to the library whenever I've had to go whether for myself or for my 8 year old but just the other day she specifically asked if we could go to the library.  Then she asked if she could get books on Lions and flowers!!  Of course!!  So that afternoon we were off to the library and we found books on Lions in addition to some other animals and even a safari book and 2 flower books.  To encourage her new found interest I decided to do some animal paper plate crafts.  So I decided to start a series of posts on animal crafts which will most likely consist of animal paper plates but who knows we could spread out our creativity to include other animal crafts!

Tiffany's first choice was a Zebra.  I used self sticking foam for the sides of the face and ears.  I am in love with sticky foam!  No glue and Tiffany loves pulling the paper off the back of the sticky part!


And here is the finished product!  I am a believer of letting children do their own work even tho at times I want to jump in and help...just a teeny bit!! But I let their work be their own.  Tiffany drew on the eyes, nose and smile! I would have preferred to have the zebra's nose area also black but ran out of black foam and no black construction paper either.  Instead I used some card stock that I had on hand and it had a pink zebra design, perfect for adding a little touch of 'girly' to it!


Tuesday, January 14, 2014

Numbers and colors

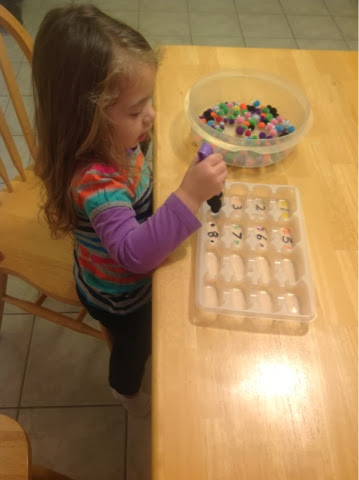
Over the Christmas holiday we received a lot of packages and in one of the packages their was an insert that was different enough for me to keep around as I felt I would be able to use it as a craft or learning activity.


I decided to work on numbers with my 3.5 year old AND colors. 


Markers didn't work as great as I had hoped but in person the marker colors were a bit more clear. 


I gave Tiffany tongs and different colored Pom-poms.  I told her to put the number and color of Pom-poms into the correct spots.  This activity was great for learning to count, color matching, sorting and fine motor skills by using the tongs.  She did switch back and forth from using tongs to using her fingers.

So next time you get something in the mail you might just be able to re-use it!!


Saturday, January 11, 2014

Paint in a bag

Normally, I don't like playing with paint because of obvious reasons. BUT, I am aware that painting whether finger painting or with a brush is good practice for pre-schoolers on multiple levels. I came across this idea on the web and I tried it out and both my 3 year old AND 8 year old had fun with it. My favorite part ....no mess!! Score!!

I added a couple of tubes of paint into a ziplock bag and taped it to our kitchen table. 

You can actually make letters and hand prints with the paint. I thought of using Q-tips to help define the letters.
After my daughter played like this for a few minutes I decided to hang it from our back door. The outdoor light against the paint gave it a whole new perspective.
This one activity offers sensory play by squishing the paint around, letter writing and recognition and making hand prints which was my 3 year olds favorite part!

Supplies:
Ziplock bag
Duct tape or painters tape
Paint

Thursday, January 9, 2014

Learning Letters and Shapes

We have tons of craft foam so I decided to cut some into shapes and have Tiffany glue them to the matching shapes that I drew on a piece of paper.  I also added the first letter of each shape to help with letter identification.  Simple to put together and fun for the little ones...win, win!!


About Me

Before my children were born my husband and I knew that I would stay home to raise our children.  Now 8 years later we are staying true to our decision.  We have an almost 9 year old son and a 4 year old daughter.  I get giddy when I read about or think up a new craft idea/learning opportunity.  I love to be creative with my kids and am always excited to see their response to the things we do together.  Since my children are almost 5 years apart their are not alot of activities I can do with both of them that are on par with each other.  Thankfully, my son will 'humor' me and make a turtle plate craft and my daughter will try holding her own at activities/games more suited for my 8 year old.  Since it's just me and my daughter home during the day I can focus on age appropriate activities for her.

As for organizing I dislike mess...mess ='s chaos for me so I am somewhat OCD when it comes to organizing and I'm ok with that! I have learned that in order for me to be in this house with my husband and 2 kids I have to be organized!

I know how excited I get when I find a creative way to learn math or letters,etc or new ideas on how to organize better and that's why I've created this blog.  To join in and hopefully contribute ideas that will help others in their day to day......

Susen


Counter Top Quick Clutter Clean-up

I bought these baskets a few months back to help keep the clutter on our limited kitchen counter space at a minimum.  It worked for the first few months but as you can see things got a bit out of control.  After just a few minutes of putting things 'in their place' our baskets were back in order and the clutter has remained at a minimum!

PictureBefore

PictureAfter

Wednesday, January 8, 2014

Kitchen Command Center

I needed to have a command center somewhere in my kitchen and this corner of the kitchen seemed to be the perfect spot.  I was inspired to do this project after reading about the command center at A Bowl Full of Lemons. I had already hung a Martha Stewart cork board and although it helped it was not going to cut it.  With all of the paperwork coming home from my son's school and my daughter's preschool I was in need of something much more.  That is when I happened upon the Hang Up Home Organizer from Thrity-One!  


This was the space I had decided on since it was in the back corner of our kitchen but yet a wall that I look at every day when I enter the room.  


This was the Hang It Up Organizer before filling it up.


Voila, the finished product! I love the calendar in the middle which is for my son's school and tells me which activities he has for each day of the week.  A spot specifically for pens and a marker for the dry erase board and 4 pouches, 2 each for both of my children, perfect!  There are also a few other small pouches which I use for coupons and post it notes.  For more hanging space I use clothespins on the top and if there is something I don't want inside pouch (out of sight out of mind) I clothespin it to the front.  I had tried several other ideas for organizing school paperwork, coupons, reminders, etc and I can honestly say this has worked great for our family!


One last close-up shot!